This article is part of a serie that will show how I have setup my own homelab.
The steps are as follows:
Edit Network Config
What do I mean by this? Basically Ubuntu uses a Client-ID that is not the MAC Address when sending a DHCP request. This means that if you create an IP reservation on your DHCP server, maybe your Ubuntu server will receive a different IP address instead of said reservation. This depends entirely on the behavior of the DHCP server, but to prevent this issue we can force our server to use its MAC Address as the Client-ID.
To set Ubuntu to use it’s MAC as the Client-ID we need to edit the network configuration file located in /etc/netplan/. For that we issue the command:
sudo nano /etc/netplan/00-installer-config.yaml
We are going to set our file as follows:
# This is the network config written by 'subiquity'
network:
  ethernets:
    eth0:
      dhcp4: true
      dhcp-identifier: mac
      nameservers:
        addresses: [1.1.1.1,8.8.8.8,9.9.9.9]
  version: 2
  renderer: NetworkManager
Here the network card is listed as eth0, and we ensure Ubuntu uses its MAC address when requesting DHCP with the line dhcp-identifier: mac. We also set the DNS servers with the nameservers block and make sure it uses Network Manager as the network config renderer with renderer: NetworkManager. Please be mindful of the indentation.
Change DNS Behavior (Optional)
By default Ubuntu uses resolvd for DNS resolution, which means it points all DNS request to the loopback IP 127.0.0.53. This is not an issue by itself, but it means that Ubuntu also keeps listening on port 53, which doesn’t allows to host any service listening on this port. If you want to host Pi-Hole (Or any DNS server) on your Ubuntu instance, then we need to change this behavior by disabling resolved:
sudo systemctl disable systemd-resolved.service && sudo systemctl stop systemd-resolved
Set your DNS server in /etc/resolv.conf to your preferred DNS server instead of 127.0.0.53.
Setup Cockpit
Cockpit is a web-based GUI for management servers that typically ships with RHEL-based distributions such as Red Hat Enterprise Linux, CentOS Stream, Rocky Linux and AlmaLinux. It’s a great way to keep tabs on your servers, manage users/groups/storage/services, update software, view logs and so much more.
Although Cockpit does come pre-installed with some of the RHEL-based Linux distributions, it is not found on Ubuntu Server out of the box. Fortunately, the process for installing Cockpit on Ubuntu Server isn’t all that challenging.
Let’s do just that.
Install Cockpit
Log into your Ubuntu Server instance and issue the command:
`sudo apt-get install cockpit -y`
Once the installation completes, start and enable Cockpit with:
`sudo systemctl enable --now cockpit.socket`
Now that Cockpit is installed and running, you can log in by opening a web browser and point it to https://your_server_ip:9090. You should be greeted by the login screen:

Setup Docker
It is perfectly possible and valid install Docker from the default Ubuntu repository with the command sudo apt install docker.io -y. However, I prefer to install Docker directly from it’s official repositories due to the simple fact that they are updated more frequently and I personally like to be up to date with the software I use. This process is explained in the following section.
Install Docker from the repository
- Set up Docker’s
aptrepository.
# Add Docker's official GPG key:
sudo apt-get update
sudo apt-get install ca-certificates curl
sudo install -m 0755 -d /etc/apt/keyrings
sudo curl -fsSL https://download.docker.com/linux/ubuntu/gpg -o /etc/apt/keyrings/docker.asc
sudo chmod a+r /etc/apt/keyrings/docker.asc

# Add the repository to Apt sources:
echo \
  "deb [arch=$(dpkg --print-architecture) signed-by=/etc/apt/keyrings/docker.asc] \
  https://download.docker.com/linux/ubuntu \
  $(. /etc/os-release && echo "$VERSION_CODENAME") stable" | \
  sudo tee /etc/apt/sources.list.d/docker.list > /dev/null
sudo apt-get update
- Install the Docker Packages:
sudo apt-get install \
  docker-ce docker-ce-cli \
  containerd.io \
  docker-buildx-plugin \
  docker-compose-plugin
- Verify that the Docker Engine installation is successful by running the
hello-worldimage.
sudo docker run hello-world
Manage Docker as a non-root user
The Docker daemon binds to a Unix socket, not a TCP port. By default it’s the root user that owns the Unix socket, and other users can only access it using sudo. The Docker daemon always runs as the root user.
If you don’t want to preface the docker command with sudo, create a Unix group called docker and add users to it. When the Docker daemon starts, it creates a Unix socket accessible by members of the docker group. On some Linux distributions, the system automatically creates this group when installing Docker Engine using a package manager. In that case, there is no need for you to manually create the group.
To create the docker group and add your user:
- Create the
dockergroup:
sudo groupadd docker
- Add your user to the docker group:
sudo usermod -aG docker $USER
- Log out and log back in so that your group membership is re-evaluated. You can also run the following command to activate the changes to groups:
newgrp docker
- Verify that you can run
dockercommands withoutsudo:
docker run hello-world
Configure Docker to start on boot
On Debian and Ubuntu, the Docker service starts on boot by default. If for some reason that is not the case with your installation, you can automatically start Docker and containerd on boot with the following commands:
sudo systemctl enable docker.service
sudo systemctl enable containerd.service
Setup Portainer
Portainer is a powerful, open source toolset that allows you to easily build and manage containers in Docker, Docker Swarm, Kubernetes and Azure ACI.
Portainer hides the complexity of managing containers behind an easy-to-use UI. By removing the need to use the CLI, write YAML or understand manifests, Portainer makes deploying apps and troubleshooting problems so easy that anyone can do it.
To install Portainer, first we need to create the volume that it will use to store its database:
docker volume create portainer_data
Then, download and install the Portainer Server container:
docker run -d -p 8000:8000 -p 9443:9443 \
 --name portainer --restart=always \
 -v /var/run/docker.sock:/var/run/docker.sock \
 -v portainer_data:/data portainer/portainer-ce:latest
Portainer Server has now been installed. You can check to see whether the Portainer Server container has started by running docker ps:
root@server:~# docker ps
CONTAINER ID   IMAGE                          COMMAND       CREATED       STATUS     PORTS                                            NAMES
de5b28eb2fa9   portainer/portainer-ce:latest  "/portainer"  4 weeks ago   Up 3 days  0.0.0.0:8000->8000/tcp, 0.0.0.0:9443->9443/tcp   portainer
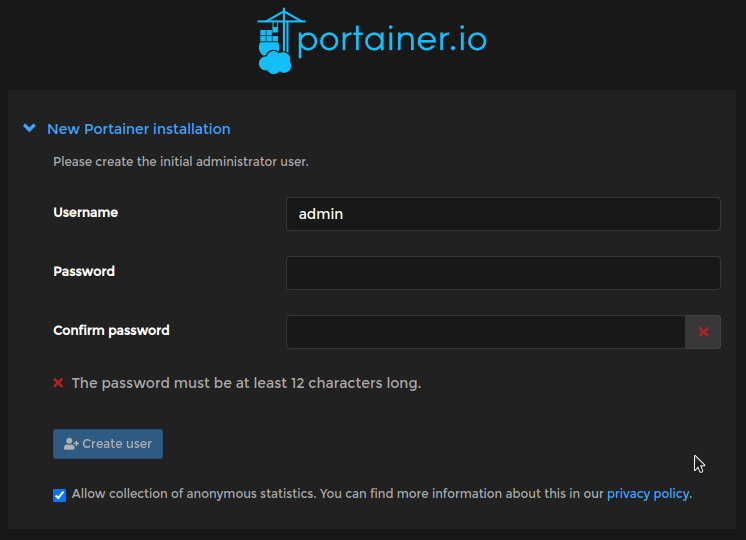
Now that Portainer is up and running, you can log in by opening a web browser and point it to https://your_server_ip:9443. You should be greeted by the setup screen: